Sunday, 2 October 2011

Typhoons Pedring and Quiel


Today is Sunday, October 02, 2011. Baguio City was on signal number 3 since yesterday and once again, we've lost our electricity but everything is OK now. Well, not quite normal yet because typhoon Pedring and Quiel left 53 people dead in the whole country and many more are still missing and unaccounted for not to mention those who sustained some physical injuries. These two typhoons that came one after the other has devastated the northern part of the country especially the agricultural sector. Prices of vegetables have gone up and almost doubled as a result of these typhoons because it damaged millions of crops not only in the highlands but also in the lowlands as well. In fact, many people especially in the lowlands have lost their homes and personal belongings because of the floods and many barangays are still submerged under water up to this time.

In my own backyard, part of the fence that separates our property to the public walkway at the back caved in because of the strong force of the  winds. We started fixing the fence this afternoon as soon as the rain stopped and hopefully, the work will be finished tomorrow. It's a good thing that we had an extra bag of cement and some river sand and gravel that are available so we were able to start the work this afternoon. Otherwise, we would have to wait for another month to be able to bring in some construction materials because part of the street in our village has been washed out and it is not passable for any type of vehicle. Another damage in our property is the leak in the roof in our 3-bedroom transient house, that has got to be fixed too. Other than these, thank God that we are safe and sound and that is more important than any material things. I pray for those people who have lost a loved one because of the floods that they may find the strength to start all over again once everything goes back to normal.  

It is at a time like this when I realize the importance of having a backyard garden because even if there will be a shortage of vegetables in the market because of these typhoons, at least there is hope that we will not go hungry as long as we have vegetables in the backyard and some backyard animals such as chickens that provides us with eggs and domesticated rabbits for meat. As soon as the immediate things are taken cared of, then I will start planning my vegetable garden in the backyard.


Saturday, 24 September 2011

Making a Swale/Berm

I was looking forward to working in the garden when I woke up this morning but it started raining again. Then our new friends who just got married a few days ago called us up and asked if we could meet them in town because they wanted to give us something and treat us for lunch. So we went out of the house and spent the morning with their company and that was very enjoyable.
It was still raining when we got back home so I ended up reading the Sunday newspaper of which I haven't had time to read since we bought the papers yesterday.

Around 3 in the afternoon, the rain stopped and I went out to the backyard garden. Instead of working on enclosing the other side of the raised bed in the middle of the garden, I worked on making a swale or berm for the rain water runoff. According to the news, we are going to get hit with another storm and the direction seems to be focused towards Northern and Central Luzon. The storm is expected to make a landfall here by tomorrow afternoon. So I decided to prioritize making the swale/berm for the water runoff before I get a flooded backyard garden. I just followed the natural slope of the land where the water usually goes down. I dug up this trench some more to make this deeper so it can accommodate more rain water runoff. Then I got some small stones from the 2-feet high retaining wall that I took off earlier and used this to line up the bottom of the swale/berm. This should reduce the flow of excess water runoff when it rains so it will not carry away the top soil from the garden. I already added some compost and rabbit manure into the raised bed at the bottom of the garden so this should help to control any water runoff from the rain. I'm thinking of putting a cover on this newly made raised bed at the bottom of the garden because I just dug it up yesterday so it is exposed to the rain. I am afraid that it might get washed out with this storm. I don't have any mulch available to cover this exposed soil but perhaps I'll find something tomorrow.


Friday, 23 September 2011

Planning the Backyard Garden

 We've been busy lately doing some shopping for a wedding gift for a friend who just got married today. So after we came home from the wedding, I took a short nap and when I woke up, my first thought was about expanding the backyard garden.  We only have 4 raised beds in the backyard garden. Two of these raised beds are short actually at just 6 feet long while the other two are 8 feet long. Two of the 6-feet long raised beds which is just behind the aviary gets the early morning sun.


The other two 8-feet long raised beds does not get the benefit of the morning sun because of the guava tree that is next to the outdoor aviary which is giving a shade to the garden. The entire garden gets the sun only from 11 in the morning until about 4 in the afternoon. The structure on the right side in the picture below is the outdoor aviary with the sun hitting the garden around mid day. I'm planning on trimming the branches of this guava tree so the sun can penetrate the garden at a much earlier time than at 11 a.m. It's just that I am hesitant to do this because this guava tree is the only one that is left after the other tree died. We don't know what caused its demise but we're guessing that perhaps the beetles must have something to do with it. When the tree died, there were a lot of beetles on the ground that fell down from the tree.


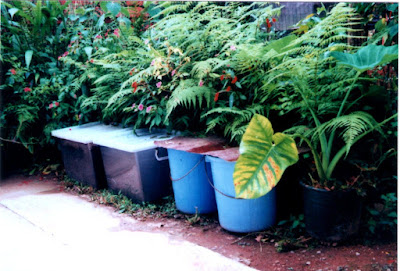
Anyway, the picture below is the end of the garden with the wire-fence concealed just behind the tall ferns and flowers. This is where I placed two of my worm bins and two extra blue pails for compost materials because it is shaded by the tall plants. This part is actually lower by 2 feet from the garden level. This 2-feet drop is held in place with a stone retaining wall which could not be seen in the picture because of the ferns and the flowers that grew in between the stone walls that is covering it. The space is about 3 feet wide with gravel over dirt and the rest is concrete. I am planning on converting this area into another raised bed to gain more space for planting vegetables. I was taking the measurements for this new expansion when the rains came so I had to go inside so it will have to wait until tomorrow.

Sunday, 28 August 2011

Rain Soaked Garden

We are now experiencing a very bad storm or typhoon that started since yesterday. As of 5 PM today, the strength of the storm has gone down to a maximum sustained winds 250 kph near the center and gustiness to 150 kph. The storm is heading towards the extreme northern part of the country and it is expected to out of the country by Tuesday afternoon. In fact, even the college students were sent home yesterday because of the strong storm. Unfortunately, 3 people died here in Baguio City alone when a retaining wall at the Irisan Dump site caved in and buried them alive. Some other 3 people are also dead in different parts of the country and some are still missing. Since our city is located high up in the mountains, we are prone to landslide and sometimes flooding in some low lying areas. In one section of the road that comes to our village, it was washed out so no cars can come in. All cars coming in to the village has to stop and turn around at the top of the street so all the villagers will have to walk at some distance to catch the  jeepney or a taxi just to go to the city proper. At Burnham Park Lake which is one of the landmarks in the city, it's also flooded.  

Now to my poor rain soaked garden. Unfortunately, the wind was so strong that my poor garden was flattened out and the new vegetable seedlings that I planted a few days earlier were all washed out. There is one plot in the garden where I took some top soil to use as a top dress for the potatoes and that section got flooded. I will have to start all over again. I may not be able to do this until after the rainy season is over which should be around the middle of  November. The cucumbers that were climbing on the fence in the garden were all blown away, they were bearing some fruits too. We have a lot of cleaning up to do because a lot of debris are strewn all over the place including some ornamental trees that were uprooted and plenty of bushes that serves as a fencing material around our property were all broken down. In spite of everything, we thank God that we are all safe and sound. I will take up gardening again when the weather permits. 

Saturday, 27 August 2011

Composting with Rabbit Manure

I already used up one full bin of aged rabbit manure as fertilizer for the potato plants. When the bin was full with rabbit poo, I put the bin outside of the rabbitry thinking that I would use it later as fertilizer in the garden. We drilled some holes on the cover to serve as ventilation for the worms but I forgot to put a second cover on top to protect the bin from the rain. So when I was ready to take out some of the manure, the compost bin was soggy from the rain water that managed to seep through the small holes on the cover. Moreover, I saw some white icky things in the compost that looked like maggots! It was so disgusting to look at that I could not bring myself to dig up the bin and I closed the cover. There were some earthworms and the top of the compost was moving with those maggots. The next day was a hot day and I thought that I'd take off the cover of the compost bin so some of the water will evaporate and the compost will not be so soggy. So that's what I did and I put back the cover after 6 hours of exposure to the sun. It was better than when I opened it first but it was still soggy.


Then I thought that maybe if I put in some shredded newspapers in the bin, it will soak up some of the water. So the next day, I got a lot of old newspapers in the house and cut them up. Then I put in as much shredded newspaper as I could, even pushing it in to the bottom to soak up the water and covered the bin. After one week, I opened the bin again and I didn't see the maggots but I saw some black creepy things in its place. They looked the size of the maggots but they are dark brown to blackish in color. Anyway, I tried to dig up the bin trying to see where the earthworms are but I could not find any. I thought that maybe they are at the bottom of the bin so I just closed the cover back and left it for another week. It wasn't soggy as when I first opened it. After the week has passed, then I dug up the compost and there were only a few of the black creepy things but no earthworm! I don't know what happened but all the earthworms were gone. So anyway, I got the compost out and used it as fertilizer on the plants. I still have another bin full of rabbit manure with some maggots in it but at least there are plenty of earthworms in the bin. Then I placed the bin outside the rabbitry with its own cover and this time, I remembered to put a second cover on top of it so the rain water will not go through the holes in the top cover. When the weather improves, I will be using this again in the garden.   

The compost bin is located under the shade of the wild ferns and flowers. This is just outside the garden and infront of the rabbitry and chicken coop. 


Friday, 26 August 2011

Planting Chayote or Sayote


The lowly Chayote or Sayote as it is commonly called here in the Philippines is nothing but lowly at all. In fact, it is a very versatile vegetable and it can be used in stir-fry recipes and soups. It can also be added to stewed or boiled chicken or meat dinner, it can be steamed and eaten with a dipping sauce of your own choice. It can also be made into pickles or candies if you know how. It keeps well even without refrigeration. I remember a time some years ago when many people in the lowlands were victims of calamities such as strong typhoons and flooding and they lost everything except for the clothes on their backs. The people of Baguio City ( that includes me of course) pooled our resources and sent plenty of sacks full of this Sayote fruits as our way of helping the victims in terms of food aide.  


We have a Sayote plant that was planted in the lower terrace near the rabbitry. The plant used to overrun the roof of the old pigsty before we converted it into the rabbitry. When we started to do the work on the rabbitry, we had to cut off the stem of the Sayote plants. Now, they are growing back again. There are still a few remaining trees that we did not cut when we got some to use as post for the chicken run. The Sayote plant uses these trees to climb onto and it is bearing some fruits now. We gather the tender shoots and its fruits for our own food consumption and we use the leaves and its vines to feed the chickens and the rabbits. Nothing is wasted with this plant. It is easy to grow sayote by using the matured ones and planting it directly on the ground and once it is already established, it will bear a lot of fruits. We apply rabbit manure directly on the plant as fertilizer. Rabbit manure is considered as cold fertilizer unlike chicken dung which has to be aged and composted before being used. This is why rabbit manure can be applied directly without burning the plants. This sayote plant thrives in a cool climate such as what we have here in Baguio City but it will have a difficult time surviving in warmer areas such as in Isabela. My sister-in-law tried planting it in Isabela but in spite of the care that they gave to the plants, they did not make it.


Thursday, 25 August 2011

Planting Snap Green Beans


I sowed some snap green beans directly on the ground near the fence and I sowed some taro plants in the forefront. The beans will use the reed sticks that were stuck on the ground to climb onto once they start growing. This is to maximize the space in our small backyard garden because the beans will grow vertically along the fence. It takes some time for the taro plant to grow anyway, about 6 months before harvest. The taro plants will not be hampering the growth of the snap green beans even with their broad leaves because by then, the latter would be climbing the fence and the reed sticks as they grow faster than the taro plants. Besides, I will be transferring the taro plants in the new hill garden once they grow bigger. When it comes to watering, both of these plants likes a lot of water so they should do well being planted together.


The picture above is the back part of the garden. The ground in this area is about 3 feet lower from the garden level. Behind the flowers and the ferns is where I planted the snap green beans. The flowers and ferns are growing in between the stone retaining walls and the potted plants at the bottom are bromeliads.  


Wednesday, 24 August 2011

Planting Cucumbers and Pachoy


I planted some more cucumbers along the fence in our small garden. You can see the cucumbers starting to bear flowers as shown in the picture above. We have a 1 x 1 inch wire mesh as fencing material around our garden to keep any unwanted visitors from damaging the plants, well mostly the chickens anyway. We have an escape artist chicken and so we have to fence off the garden or he would have a field day overhauling the garden all by himself. We also use the wire mesh fence as a trellis where the cucumbers will climb onto as they grow. You can see one fat cucumber along the fence in the picture below. Since the cucumbers are trained to grow in a vertical position, this makes the ground free for me to plant some other kind of vegetables so I can maximize my planting space.


The plot where I planted the cucumbers is about 3 feet wide at its narrow end and 4 feet at its widest. Being a short woman at only 5' 2"tall, this makes it hard for me to reach for the cucumbers without stepping on the plot itself. So what I did is to divide this plot into two sections. I made a 1-foot-wide raised bed for the cucumbers which is near the fence, then I made a path where I could step on if I wanted to get some cucumbers. I dug the dirt on the path and used this to raise the 1-foot-wide bed for the cucumbers.


After I made the path, I made a raised bed out of the rest of the plot which turned out to be narrow but that's okay with me. It's actually less than 2-feet wide but that's enough for me. I sowed some Chingkang or Pachoy at one end of this bed, this is a leafy green vegetable that can be harvested in two months time. If the rains will not wash away the seedlings, then I will have some green leafy vegetables to transplant soon in this new raised bed.

Tuesday, 23 August 2011

Planting Potatoes

Mary, my best friend who is also my neighbor has given me some potato planting materials and I planted them in one plot in our small garden about a month ago. She said that I have to bury the whole plant and cover all of it with soil and that it would take two weeks before the plants will emerge from the soil. But first, I have to prepare the plot and put some chicken manure in the holes and cover it thinly with soil then leave it there for two days before planting. However, I did not have any composted chicken manure so I did not put in any. Knowing that she is a farmer and she comes from a farming community, she knows what she is talking about so I followed the rest of her advise even if I did not use any chicken manure.

A picture of the potato plot above. The structure on the left side with a plastic cover is the outdoor aviary and further beyond is the chicken run with some of the chickens roosting on the branches.


In two weeks time, sure enough, the potato plants did come out just like she said they would. When my friend Mary came for a visit yesterday, she noticed that my potato plants were growing tall but my raised bed was not enough. She advised me to do some top dressing on the plants and to raise it to about 1-foot high so the potato plants will have enough room to grow and to put some fertilizer on the plants. Since I read on the Internet that rabbit manure can be applied directly on the plants as fertilizer without it burning the plants, so I took some aged rabbit manure from my compost bin and applied about 1 inch around the stems of the potatoes but not directly touching the plants. Then I covered these with 6 inches of top soil which I took from the vacant plot so the flies will not get into the manure. It rained this afternoon as soon as I finished working in the garden so I didn't have to do the watering myself. This is the rainy season here now in the Philippines and I just hope that my potatoes will survive the rains.

Monday, 22 August 2011

Spring Onions in a Plot

I use a lot of spring onions in my cooking specially when I am making comfort food or even if the recipe does not call for it, I still use it because we like it. The spring onion sometimes takes the place of the onion bulb in my cooking. If I happen to ran out of onion bulbs, I substitute it with spring onions and it still tastes good. We all like to eat comfort food especially when it is raining. This is the rainy season here now so I cook a lot of hot soups and I add spring onions in my recipes. I also use spring onions when I am making arroz caldo which is one of our favorite comfort food. I like the idea of picking up the fresh spring onions straight from the garden whenever I needed some of it in my cooking.  

My DH is usually the one who does the gardening in our backyard but since he is busy right now, so I took over the garden and planted some spring onions in the smallest plot. My sister bought me a kilo of spring onions in the market as my planting material. We first cut off the upper green leaves and used that for cooking. What was left was only 2 inches of the white stalks from the roots. This is what I used as planting material. I planted them just last week and now we could see some green leaves coming out of the white stems. I used to have some spring onions planted in one corner of the garden but I used them all up which is why I wanted to plant some more so I don't run out of it.

The plot of spring onions and on the right side is the outdoor aviary.


This is the smallest plot in the backyard garden planted with spring onions.

Sunday, 21 August 2011

Planting Taro in Dry Land

Well, it is really the rainy season now here in the Philippines but we've been having some sunny days lately for the past week or so and this encouraged me to do some planting in our small backyard garden. My sister bought some taro plants in the market. These are the big one that are ready for cooking and they do not sell any smaller plants that are ready for planting. What we do to get our planting material is to cut off the leaves and the stalks and leave only about 3 inches of the stalk at the base. Then from the 3 inches of stalk that is attached to the tuber, we go down 2 inches then cut off the bottom end. What is now left is what will be used for planting material, a 3 inches of stalk with 2 inches of tuber attached. The rest of the plant goes into the pot for cooking.

We do not sow the planting materials right away. We first dry them out in the sun for at least two days to make the cut portion dry so the worms will not eat them. After two days of drying under the sun, I sowed the plant materials in a prepared plot which is a mixture of soil and composted rice hull that I removed from the chicken coop. Many people here in the Philippines plant Taro in wet land but since I do not have that, so I will have to make do with what I have and plant them in dry land. Having the rice hull mixed in with the soil will make the rain water to drain faster but I figured that with the rainy days being here, it should help the plant to take root faster. We planted some beans and Pechay in this same plot the last time but now I am practicing a crop rotation so I am sowing taro plants in this bed this time.

Friday, 8 July 2011

Gardening with Herbs

Parsley


Sweet basil


Rosemary

 
Purple basil and Oregano in the pot at the bottom of the red salvia flowers.


My husband and I sometimes go to the City Orchidarium, this is a plant nursery here in Baguio City, just to look at the flowers and the many different plants that are on display. We both love having flowers around the house and we would sometimes buy them in bulk together with some pots for to be used for re-planting them. Then we would display all the flowers in strategic locations around the house so we could admire them. That particular day that we went to the Orchidarium, I wanted to buy some herbs so I could start my herb garden because I wanted to have some fresh herbs that I could use in my cooking. So we bought one pot for each kind of herbs such as thyme, sage, lavender, mint, sweet marjoram, sweet basil, parsley, oregano, rosemary, fennel, lemon balm, onion leeks or what we call spring onions and pandan.  When we got home, I re-planted them in one of the garden beds and then watered them.

The herbs grew well in the garden bed. My husband bought some name plate and wrote the herbs name on each of them and covered these with plastic then he stuck these to the ground to identify each plant. He made a really good job and it was a pretty sight to see that anyone who comes over for a visit always had something nice to say about our small garden. Then one day, we had a really bad storm and it wiped everything away in the garden. It just kept on raining for days that it saturated the garden beds and caused the herbs to rot. So we decided that the next time we plant some herbs, we will plant them in pots so we could move them around or bring them in under the awning to protect them from the rain.


Thursday, 7 July 2011

Broccoli Rabe and Arugula

Broccoli Rabe

Pronunciation: [RAHB]

A vegetable related to both the cabbage and turnip family, the leafy green broccoli rabe has 6- to 9-inch stalks and scattered clusters of tiny broccoli like buds.

I had to look that up because there is a story behind this broccoli. The dark colored leaves in the picture above is called broccoli rabe. The lighter colored leaves are aragula plants, very tasty and good for stir fry recipes. Anyway, my husband bought a packet of seedling material from the gardening section at SM mall here in Baguio City. This one packet contained several different kinds of vegetables and were wrapped in their own individual foil pouch. One of the pouch is that of the broccoli and the other is aragula and we planted these side by side in one of the garden beds. They both grew well and when it was time to gather, the aragula plants were harvested first and we left the broccoli behind. We thought that the broccoli needed more time to form into a ball-like cluster, just like the ones that we normally buy in the market.

Then one day, my sister-in-law Emy asked me why we were not gathering the broccoli plants. She said that the vegetables have been ready for harvest a week ago, in which I replied that no, they're not matured enough yet. My husband and I were waiting for the plants to form into a ball-like cluster and since they're not in that stage yet, so they're still young. So then she explained to us that what we had planted was a different kind of broccoli. In fact, they used to grow these in her hometown in Kapangan Benguet and they were sold at a higher price than the regular broccoli that we know of. Ha-ha, that was really something new to us. So anyway, we both gathered the broccoli and divided the produce between us. I cooked my share in a stir fry recipe and it tasted good but I found it a little tough. Had we known that this kind will not form into a ball-like cluster, we would have gathered them earlier while they were younger and they would have been more tender. It's a lesson learned in gardening with vegetables for newbies like us.

Wednesday, 6 July 2011

Tomato Gardening


These tomatoes are our very own produce from the small garden in the backyard. When we first started planting tomatoes in the garden, we were so happy to see the flowers when they came out. We used to count the number of flowers on each vine everyday and we could hardly wait for them to grow up fast enough so we could gather them. The plants grew thick and healthy and they were about 5 feet tall with plenty of fruits on the vine. Then one day, they all got attacked by something that we don't know of and the stems started to turn brown. The fruits were not spared and they got some brown spots on them too until they all died. That was really very very frustrating for us. 

We tried planting again the second time. This time, we planted them in pots and kept them away from the garden thinking that there might be a lot of pests that are affecting them in the garden. Since we didn't want to use any pesticides, so what we did is to place some of them on the stairs away from the garden and some at the back porch. They grew well but not as tall as the ones that we had in the past when we planted them in the garden. We were able to get some small tomatoes but most of them ended up with the same  brown spots on the stems and fruits. So we gave up, said that we're done, no more planting of tomatoes! 

Well, easier said than done, we did try planting tomatoes again the 3rd time. What did we do this time that's different from the previous experiments? Well, we planted them at the right time, just after the rains. Whenever we water the plants, we try and avoid getting the leaves to get wet so they will not get easily attacked by pests. We also planted them apart at some distance from each other so if one should get attacked, it will not transfer to the rest. The plants made it this time and they produced plenty of big beefy tomatoes as shown in the pictures above.  I processed some of the produce into green tomato relish and it has served us for many months. I also gave some bottled green tomato relish to some of our friends who were delighted, knowing that our produce came from an organic garden. We used some in our salads and sandwiches after ripening them on the window sill in the picture window. It was really a very rewarding experience for us.

Tuesday, 5 July 2011

Composting in the Backyard

When it comes to wastes collection, the local city government of Baguio City strictly imposes the "No Segregation, No Collection" policy. Segregation of biodegradable materials from non biodegradable are to be done by everybody in every household in all the 125 barangays in the city. Before anyone can bring their trash bag into the collection area, they have to make sure that they did a proper segregation of biodegradable materials from other kinds of wastes or else the barangay council who are manning the disposal area in the barangay will not accept the trash bag. This policy has prompted us to make our own compost pile in the backyard. Before we converted the old pigsty into a rabbitry, we were using one corner of the last compartment in the pigsty as a composting area. What we did to hasten the decomposition process of the compost pile is to put a black plastic tarp over it and this heats up the compost pile faster. Then twice a week, we would turn the compost pile over and spray it with a little water, just enough to make the compost material moist. Once the compost is ready, then we bury it in the soil in the garden beds. We water the garden beds lightly and then wait for a week before we start planting the vegetables. We do not use chemical fertilizers in our garden, which makes our vegetables organically produced. This is our goal in having a vegetable garden in the backyard, to produce organic vegetables for our own consumption.
 
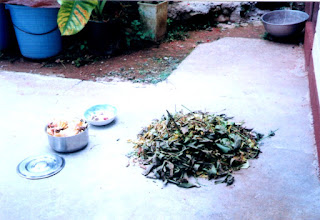
Chopped leaves and kitchen wastes for the compost bin.

Big plastic compost bin with shredded and soaked newspapers.

The shredded and soaked newspapers with about 3-4 inches thickness goes in the bottom first.

Then the rest of the chopped up leaves and kitchen wastes goes in as well. When the bin is about half-way full, then we put in the earthworms.

After we converted the old pigsty into a rabbitry, we didn't have the space anymore for a composting area so I bought two bins for composting purposes. We drilled some holes at the bottom and near the top for ventilation purposes because we were going to use earthworms to convert the wastes into a rich organic fertilizer. We have plenty of gumamela bushes around our property that serves as a fence. My husband trims these gumamela bushes regularly and we give the tender shoots and leaves of the plants to our rabbits. The rest of the trimmings are cut into smaller pieces and thrown into the compost bin together with some vegetables and fruit peelings from the two kitchens. Between my own kitchen and that of my sister-in-law's kitchen, we generate a lot of kitchen scrap for the compost. 


Monday, 4 July 2011

Converting a Rock Garden into a Vegetable Garden.


This area used to be a small rock garden in the backyard. It was filled with  different kinds of ornamental plants and flowers that we have collected over the years. There were too many plants of different varieties that I could not even name them all. So anyway, one day, my husband and I were talking about the idea of having a small garden in the backyard. The more that we talked about it, the more that we liked the idea of raising our own organic vegetables. The problem is, we did not have the space to make a garden in the backyard but we had a small rock garden. So we talked about the possibility of converting our small rock garden into a vegetable garden. We both agreed that we could put all the flowers that we like into pots so we could move them around the property or wherever we wanted them to be and make use of the space for a vegetable garden.

Well, it's easier said than done.  It took us about two weeks just to clear out the area of small stones and gravel, it was hard work but it was worth it. Because of space constraints, we were able to make three small plots only. Well, three plots is actually better than nothing. We used stones of various shapes and sizes just to make a retaining wall along the sides of the garden plots to contain the soil in the raised beds.  Then my husband made a one-foot walkway in between the two rows of raised beds and he laid some flat stones over this walkway so it will not have to be muddy specially when it rains. We bought a roll of three feet tall 1 x 1 hole wire mesh material and used this as a fence to enclose the perimeter of the garden. Now that we have some native chickens in the backyard, I'm glad that we decided to put up this fence in the garden. This fence keeps the chickens out and deters them from messing with the vegetable garden. There is a runt among the chickens who is an escape artist and we always find her scratching near the garden fence.