Showing posts with label raised bed gardening. Show all posts

Saturday, 20 April 2013

Planting Cabbage

Interspersed with the Cabbages are some flowers such as Petunias, Snap Dragons, Spring Onions and Chives.

I started the cabbages from seeds a few months ago and when they had their two sets of true leaves, I transferred them individually into plastic cups and let them stayed there for about a month. Then I had to transfer them into their permanent home. I was debating whether I should put them into 5-gallon buckets or into a raised bed. Finally, I chose to use this raised bed as their permanent place and reserved the 5-gallon buckets for my tomatoes. Since this is my first time to plant this kind of vegetable, I had to do a lot of reading about planting cabbage. I got swamped with "information overload" that I had a migraine he-he-he. Anyway, I spaced the seedlings in a zigzag manner so their distance are about 1 square foot away from each other. That should give them plenty of space to grow and it worked.

Anyway, I also read a lot of information on the Internet about companion planting and how it benefits the main crop if these were planted next to each other. The beneficial effects of these flowers and/or herbs are to deter some pests that likes to eat on the main crop. Petunias and Snap Dragon flowers are said to be good companion plants for cabbages so I sowed some seeds of these flowers. As usual, I sowed too many seeds of and since I don't like throwing away any plants that germinated, I had to find a place for all of them. As soon as the seedlings were ready for transplant, I planted some of them into the spaces in between the cabbages. The cabbages grew well and healthy and all the flowers are now in full bloom. It's a lovely sight to see, thank God for the beauty of the flowers! My Hubby and I often spend many a time just sitting on the bench in the garden and admiring the beauty and serenity of our small backyard garden while enjoying a cup of coffee. 


Wednesday, 15 February 2012

The New Terraced Garden


This is what the garden looks like after I completely overhauled the old garden.  I made use of the sloping terrain to create a terraced garden with raised garden beds. This backyard garden maybe small in size but I like it much better now. By using vertical structures such as the Sweet Peas and Green Beans trellises, these increases the planting space even in a small area. Someday, I would like to put up a white picket fence gate at the entrance to the garden. The smaller potted flowers are Delphiniums while the bigger potted plants are tomato seedlings which were transferred later on in the patio near the entrance to our place. I planted Pak-Choi and Mustard greens in this new raised bed and we enjoyed many delicious fresh organic vegetables out of this garden.


The pictures below were taken from another angle just to show you the relationship between the garden and the rabbitry in the background. The first picture below was taken while standing near the Green Bean trellis while the last picture at the bottom was taken from the doorway of the rabbitry. The sitting area for the guests could be seen in the background from the rabbitry. My 4 nephews and a niece often brings home their friends because they like to show off the rabbitry and the garden. Sometimes, even the elementary or grade school pupils who have heard about our rabbitry would drop by the house after school just to admire the flowers and the gardens including the rabbits. It's a small space really but it is a delight to see other people enjoying the simple scenery. Well, I hope you enjoyed the pictures as much as I enjoyed writing about my adventures in the garden for the summer.Don't forget to visit my other blogs as well by checking out my profile.


Friday, 23 September 2011

Planning the Backyard Garden

 We've been busy lately doing some shopping for a wedding gift for a friend who just got married today. So after we came home from the wedding, I took a short nap and when I woke up, my first thought was about expanding the backyard garden.  We only have 4 raised beds in the backyard garden. Two of these raised beds are short actually at just 6 feet long while the other two are 8 feet long. Two of the 6-feet long raised beds which is just behind the aviary gets the early morning sun.


The other two 8-feet long raised beds does not get the benefit of the morning sun because of the guava tree that is next to the outdoor aviary which is giving a shade to the garden. The entire garden gets the sun only from 11 in the morning until about 4 in the afternoon. The structure on the right side in the picture below is the outdoor aviary with the sun hitting the garden around mid day. I'm planning on trimming the branches of this guava tree so the sun can penetrate the garden at a much earlier time than at 11 a.m. It's just that I am hesitant to do this because this guava tree is the only one that is left after the other tree died. We don't know what caused its demise but we're guessing that perhaps the beetles must have something to do with it. When the tree died, there were a lot of beetles on the ground that fell down from the tree.


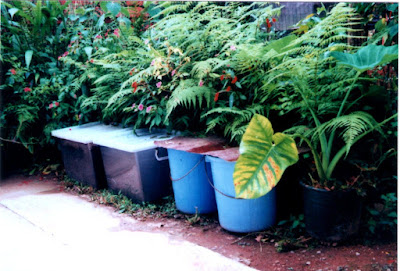
Anyway, the picture below is the end of the garden with the wire-fence concealed just behind the tall ferns and flowers. This is where I placed two of my worm bins and two extra blue pails for compost materials because it is shaded by the tall plants. This part is actually lower by 2 feet from the garden level. This 2-feet drop is held in place with a stone retaining wall which could not be seen in the picture because of the ferns and the flowers that grew in between the stone walls that is covering it. The space is about 3 feet wide with gravel over dirt and the rest is concrete. I am planning on converting this area into another raised bed to gain more space for planting vegetables. I was taking the measurements for this new expansion when the rains came so I had to go inside so it will have to wait until tomorrow.

Tuesday, 23 August 2011

Planting Potatoes

Mary, my best friend who is also my neighbor has given me some potato planting materials and I planted them in one plot in our small garden about a month ago. She said that I have to bury the whole plant and cover all of it with soil and that it would take two weeks before the plants will emerge from the soil. But first, I have to prepare the plot and put some chicken manure in the holes and cover it thinly with soil then leave it there for two days before planting. However, I did not have any composted chicken manure so I did not put in any. Knowing that she is a farmer and she comes from a farming community, she knows what she is talking about so I followed the rest of her advise even if I did not use any chicken manure.

A picture of the potato plot above. The structure on the left side with a plastic cover is the outdoor aviary and further beyond is the chicken run with some of the chickens roosting on the branches.


In two weeks time, sure enough, the potato plants did come out just like she said they would. When my friend Mary came for a visit yesterday, she noticed that my potato plants were growing tall but my raised bed was not enough. She advised me to do some top dressing on the plants and to raise it to about 1-foot high so the potato plants will have enough room to grow and to put some fertilizer on the plants. Since I read on the Internet that rabbit manure can be applied directly on the plants as fertilizer without it burning the plants, so I took some aged rabbit manure from my compost bin and applied about 1 inch around the stems of the potatoes but not directly touching the plants. Then I covered these with 6 inches of top soil which I took from the vacant plot so the flies will not get into the manure. It rained this afternoon as soon as I finished working in the garden so I didn't have to do the watering myself. This is the rainy season here now in the Philippines and I just hope that my potatoes will survive the rains.

Thursday, 7 July 2011

Broccoli Rabe and Arugula

Broccoli Rabe

Pronunciation: [RAHB]

A vegetable related to both the cabbage and turnip family, the leafy green broccoli rabe has 6- to 9-inch stalks and scattered clusters of tiny broccoli like buds.

I had to look that up because there is a story behind this broccoli. The dark colored leaves in the picture above is called broccoli rabe. The lighter colored leaves are aragula plants, very tasty and good for stir fry recipes. Anyway, my husband bought a packet of seedling material from the gardening section at SM mall here in Baguio City. This one packet contained several different kinds of vegetables and were wrapped in their own individual foil pouch. One of the pouch is that of the broccoli and the other is aragula and we planted these side by side in one of the garden beds. They both grew well and when it was time to gather, the aragula plants were harvested first and we left the broccoli behind. We thought that the broccoli needed more time to form into a ball-like cluster, just like the ones that we normally buy in the market.

Then one day, my sister-in-law Emy asked me why we were not gathering the broccoli plants. She said that the vegetables have been ready for harvest a week ago, in which I replied that no, they're not matured enough yet. My husband and I were waiting for the plants to form into a ball-like cluster and since they're not in that stage yet, so they're still young. So then she explained to us that what we had planted was a different kind of broccoli. In fact, they used to grow these in her hometown in Kapangan Benguet and they were sold at a higher price than the regular broccoli that we know of. Ha-ha, that was really something new to us. So anyway, we both gathered the broccoli and divided the produce between us. I cooked my share in a stir fry recipe and it tasted good but I found it a little tough. Had we known that this kind will not form into a ball-like cluster, we would have gathered them earlier while they were younger and they would have been more tender. It's a lesson learned in gardening with vegetables for newbies like us.

Monday, 4 July 2011

Converting a Rock Garden into a Vegetable Garden.


This area used to be a small rock garden in the backyard. It was filled with  different kinds of ornamental plants and flowers that we have collected over the years. There were too many plants of different varieties that I could not even name them all. So anyway, one day, my husband and I were talking about the idea of having a small garden in the backyard. The more that we talked about it, the more that we liked the idea of raising our own organic vegetables. The problem is, we did not have the space to make a garden in the backyard but we had a small rock garden. So we talked about the possibility of converting our small rock garden into a vegetable garden. We both agreed that we could put all the flowers that we like into pots so we could move them around the property or wherever we wanted them to be and make use of the space for a vegetable garden.

Well, it's easier said than done.  It took us about two weeks just to clear out the area of small stones and gravel, it was hard work but it was worth it. Because of space constraints, we were able to make three small plots only. Well, three plots is actually better than nothing. We used stones of various shapes and sizes just to make a retaining wall along the sides of the garden plots to contain the soil in the raised beds.  Then my husband made a one-foot walkway in between the two rows of raised beds and he laid some flat stones over this walkway so it will not have to be muddy specially when it rains. We bought a roll of three feet tall 1 x 1 hole wire mesh material and used this as a fence to enclose the perimeter of the garden. Now that we have some native chickens in the backyard, I'm glad that we decided to put up this fence in the garden. This fence keeps the chickens out and deters them from messing with the vegetable garden. There is a runt among the chickens who is an escape artist and we always find her scratching near the garden fence.